
Hi crafty friends! I have a new Mini Album Monday to share. This project has 2 objectives. One, Mini Album Monday and two Pebbles Inc. July Travel challenge! I used the adorable Hexagon Mini Album by Paige Taylor Evans. And mostly Pebbles Inc. Oh Summertime collection!

The cutfile is very simple to cut. After, you just fold on the perforated lines to make the shape. I would suggest adding your ribbon now before you start to adhere your pictures or embellishments. This way you avoid having to take the middle hexagon apart to feed the ribbon through!

I did not want to make the album to thick so I used all flat pieces on the inside. I did add a small mat to each photo and used up some food icons from the collection!
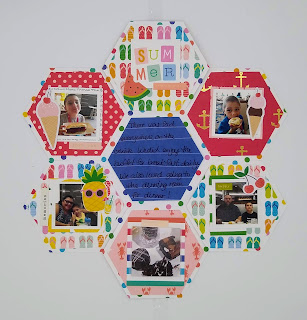
For the top hexagon, I decided to make it a subtitle. The summer card was too cute not to use and the little watermelon was perfect for the corner.

After placing the bigger embellies down I grabbed word/word phrase stickers from other Pebbles Inc. collections to scatter around.

I decorated one of the outside flaps. Very simply with the adorable mermaid and journaling card sentiment, Relax and Enjoy.

To finish my album off I added the Sunshine chipboard piece, a face button, and small foam Thickers. To help the title stand out I rubbed my fingers in the Distress Oxide ink fossilized amber and smudge it on the letters.
I think the mini album turned out so cute. Thank you so much for stopping by. I hope you find some inspiration to get scrapbooking!

The cutfile is very simple to cut. After, you just fold on the perforated lines to make the shape. I would suggest adding your ribbon now before you start to adhere your pictures or embellishments. This way you avoid having to take the middle hexagon apart to feed the ribbon through!

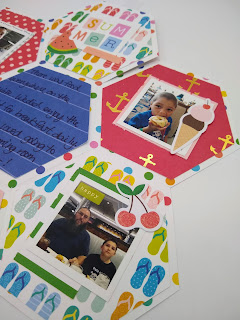
I did not want to make the album to thick so I used all flat pieces on the inside. I did add a small mat to each photo and used up some food icons from the collection!

For the top hexagon, I decided to make it a subtitle. The summer card was too cute not to use and the little watermelon was perfect for the corner.

After placing the bigger embellies down I grabbed word/word phrase stickers from other Pebbles Inc. collections to scatter around.

The only paper I used that was not from the Pebbles Inc. collection was that cute paper with the gold anchors. It was on clearance at Micheal's and I could not say no for the price!

I decorated one of the outside flaps. Very simply with the adorable mermaid and journaling card sentiment, Relax and Enjoy.

To finish my album off I added the Sunshine chipboard piece, a face button, and small foam Thickers. To help the title stand out I rubbed my fingers in the Distress Oxide ink fossilized amber and smudge it on the letters.
I think the mini album turned out so cute. Thank you so much for stopping by. I hope you find some inspiration to get scrapbooking!


